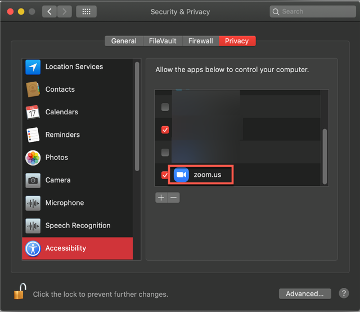
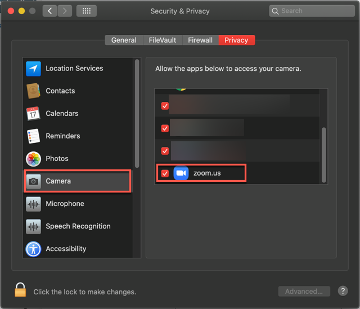
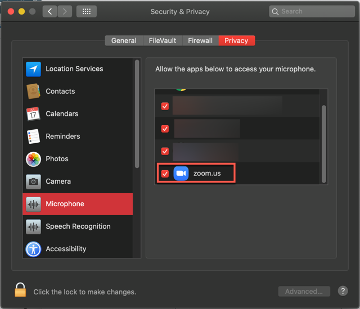
When you first use Zoom or WebEx on a Mac, you will need to grant it access to your Microphone and Camera in Privacy and Security; you will all need to do this for Screen Recording to share your screen. Once enabled, you will need to completely quit Zoom or WebEx and reopen. The user will also need to give permissions in this panel to share their screen after attempting to screen share for the first time
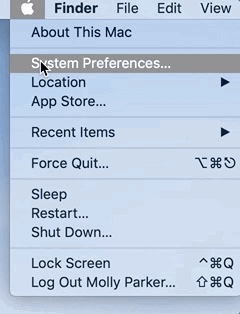
Step 1
Click the Apple logo at the top left corner of your screen.
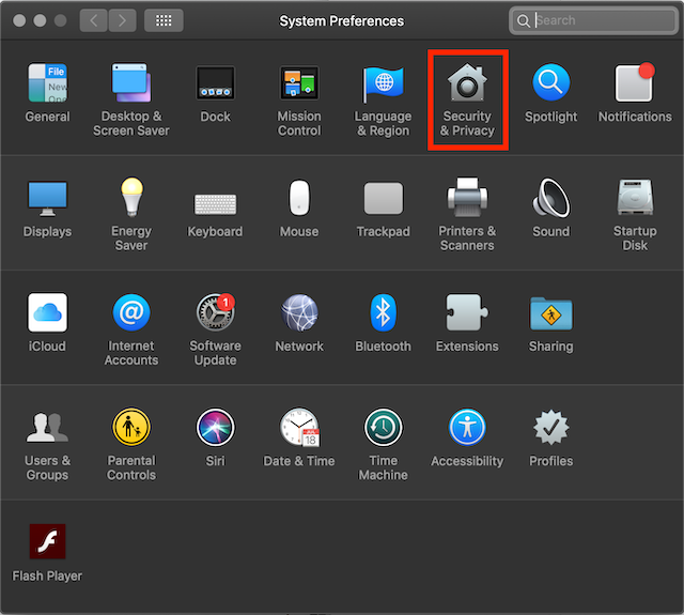
Step 2
Click System Preferences.
Step 3
Click Security & Privacy.
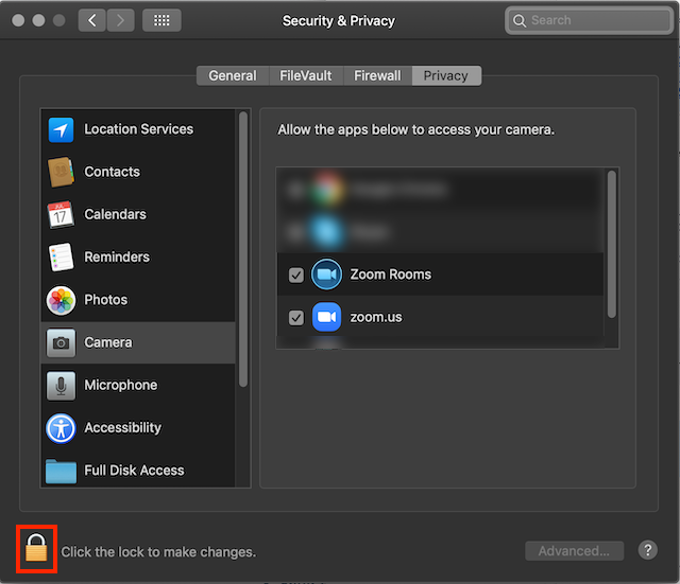
Step 4
Select the Privacy tab
Step 5
At the bottom-left corner of the Security & Privacy window, click the lock icon to make changes.
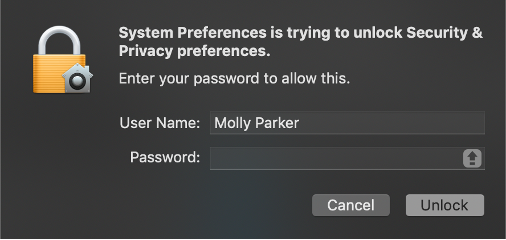
Step 6
Enter your OS administrator username and password, then click Unlock.
Step 7
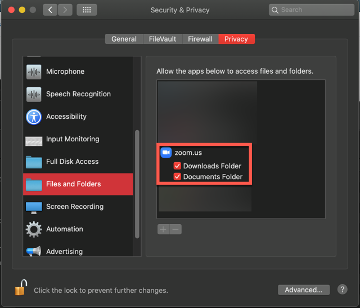
Click the permission that you need to change Camera, Microphone, Screen Recording, Files and Folders, or Accessibility.
Step 8
Click the checkbox next to zoom.us and/or Zoom Rooms.
Note: For Local Recording on Catalina, you need to click the checkbox for at least the Documents Folder option under zoom.us.
Step 9
A window will appear asking you to restart Zoom or the Zoom Rooms application. If you need to allow other permissions, click Later and repeat steps 7 and 8 for any additional permissions you need to enable.
Step 10
Once you've allowed all necessary permissions, click Quit Now.
Step 11
Permissions for the Zoom desktop client
The Zoom desktop client may ask you to authorize access to the following permissions, depending on which features you are accessing in Zoom:
Camera - For sharing your video in a meeting or webinar
Microphone - For joining computer audio in a meeting or webinar
Screen Recording (Mac OS 10.15 Catalina and higher) - For sharing your screen in a meeting or webinar

Files and Folders (Mac OS 10.15 Catalina and higher) - For sharing and saving files from chat in a meeting or webinar, as well as recording locally to your computer.
Accessibility - For allowing remote control in a meeting
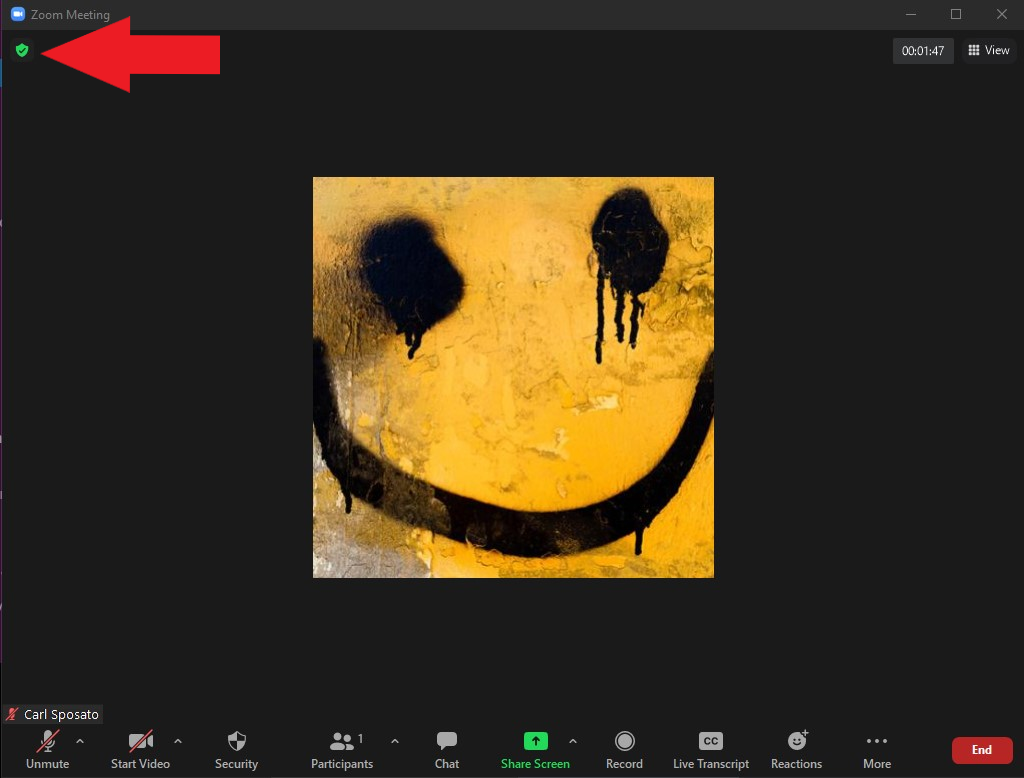
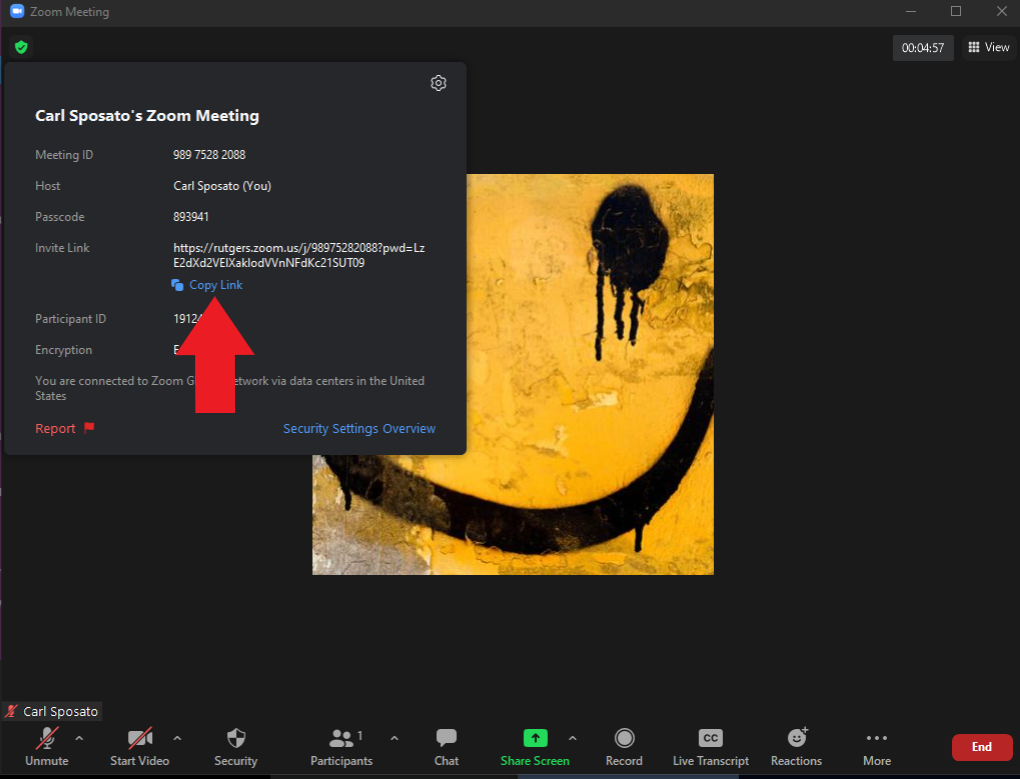
You can always access the meeting link within the active meeting by clicking on the meeting information icon that looks like a shield in WebEx or the meeting information icon that looks like a shield in Zoom, copying the link to your clipboard and pasting it into a mail or other message.
Please be aware that some students using Office 365 may get sent erroneous Microsoft Teams meetings link if their calendar item was not set up correctly
If you have an attendee that is not able to connect to the meeting it is always good to start at the very basics. Some things to check are:
- The first thing to do is ask them about their issue in order to determine what actions they are taking and what they believe is not working for them.
- Are they able to open any web pages?
- Are they prompted or do they have an open prompt to install WebEx or Zoom?
- If you send them a mail with the meeting link do they receive it? Are they able to open and connect with it?
First, see if the user is using the system speakers or a headset; make sure the system audio is not muted by checking the volume indicator and increasing the volume to ensure the system is not muted. Check to see what the correct output is selected in the remote client software; In Zoom and WebEx, by clicking on the arrow next to the microphone icon, you can change your selected audio input and output and access the sound setup and test panel. If using a Mac, please check the privacy and security permissions are enabled for the speakers.
Step 1
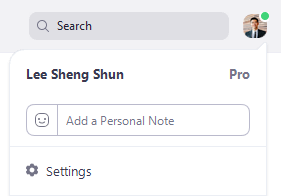
Sign in to the Zoom desktop client. Click your profile picture, then click Settings.
Step 2
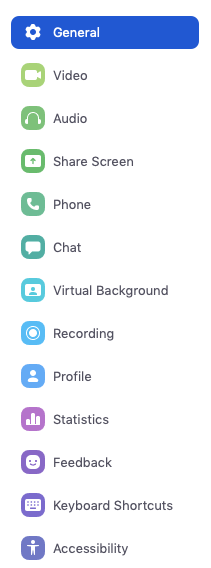
This will open the settings window, giving you access to the following options:
- General
- Video
- Audio
- Share Screen
- Phone
- Chat
- Virtual Background
- Recording
- Profile
- Statistics
- Feedback
- Keyboard Shortcuts
- Accessibility
Step 3
Select AUDIO
Select SPEAKER: Click TEST SPEAKER to play a test tone. Click the drop-down menu to select the speaker you want Zoom to use.
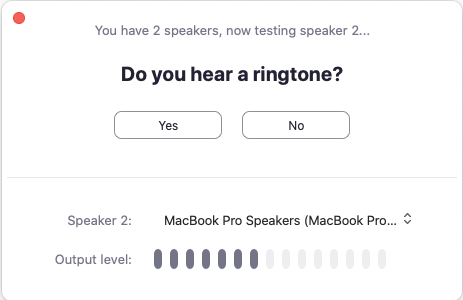
The meeting will display a pop-up window to test your speakers. If you don't hear the ringtone, use the drop-down menu or click No to switch speakers until you hear the ringtone. Click Yes to continue to the microphone test.
Step 4
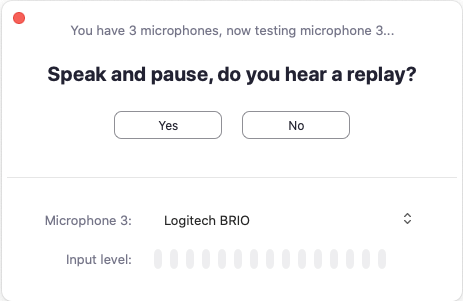
If you don't hear an audio replay, use the drop-down menu or click No to switch microphones until you hear the reply. Click Yes when you hear the replay.
To enable the dual monitor feature for your own use:
- Sign in to the Zoom Client.
- In the top-right corner of the Zoom Client, click your profile picture then click Settings.
- Click the
 General tab.
 - Select the Use dual monitors check box.
Note: On the macOS version of the desktop client, dual monitor mode can be enabled with the Command(⌘)+Shift+D keyboard shortcut. You must be on version 5.8.6 or higher to utilize this shortcut.
Step 1
Click Share Screen ![]() located in your meeting controls.
located in your meeting controls.
Select one of these screen share options:
- Basic: Share your entire desktop, specific application windows, whiteboard, or iPhone/iPad screen. Note: Users can select multiple desktop programs at once instead of sharing their entire desktop, but all selected programs must be on the same screen to be visible. Only the user employing this feature will need to be on version 5.4.3 or higher while viewers can be connected with older versions. Hold the Shift key on macOS or the Ctrl key on Windows to select more than one application.
- Advanced
 Slides / PowerPoint as Virtual Background: This allows you to utilize a slideshow presentation as your virtual background, providing a more immersive presentation.
 Portion of Screen: Share a portion of your screen represented by a green border. The border can be adjusted as needed during the share by clicking and dragging any side or corner.
 Computer Audio: Only share your computer's audio (your selected speaker in your audio settings). Select the down arrow
  to the right of the Computer Audio option to view audio options and switch between Mono and Stereo (high fidelity) audio options.
 Video: Share locally stored video content through Zoom's native video player.
 Content from 2nd Camera: Share a secondary camera connected to your computer, for example, a document camera or the integrated camera on your laptop
Step 2
(Optional) Enable these features, located in the bottom-left corner of the share window:
- Share sound: If you check this option, any sound played by your computer will be shared in the meeting. Select the down arrow just to the right of the Share Sound option to switch between Mono and Stereo (high fidelity) audio options.
- Optimize for video clip: Check this if you will be sharing a video clip in full-screen mode. Do not check this otherwise, as it may cause the shared screen to be blurry.
- Share to breakout rooms: This allows the host or co-host to share their screen from the main session directly into all open breakout rooms.
Step 3
Click Share. When the sharing process is started and 80% of devices acknowledge receiving the shared screen, you will see a notification banner stating. Participants can now see your shared screen or whatever you have chosen to share.
Step 4
Click Share. When the sharing process is started and 80% of devices acknowledge receiving the shared screen, you will see a notification banner stating. Participants can now see your shared screen or whatever you have chosen to share.
Controls when screen sharing
When you start sharing your screen, the meeting controls will move into a menu that you can drag around your screen.
Note: Some of the options features are only visible to the meeting host or co-host.
- Mute/Unmute: Mute or unmute your microphone.
- Start/Stop Video: Start or stop your in-meeting video.
- Security: Access in-meeting security options.
- Participants: View or manage the participants (if you're the host).
- Click the down arrow to access Invite, where you can invite others to join the meeting.
- Click the down arrow
- Polling: This allows you to create, edit, and launch your polls. The options to create or launch polls will open up the Zoom web portal in your default browser. When the poll closes, you can view the results and can download the full poll report. If a poll has already been created, both host and co-host can launch the poll, but only the host can edit or add polls to the meeting.
- New Share: Start a new screen share. You will be prompted to select which screen you want to share again.
- Pause Share: Pause your current shared screen.
- Annotate: Display annotation tools for drawing, adding text, and so on.
- More: Hover over More for additional options.
- Chat: Open the chat window.
- Record: Start recording locally or to the cloud.
- Meeting Info: Shows the current meeting's ID, host, passcode, invite link, your participant ID, and encryption status.
- Closed Caption / Live Transcript (only available to the host): If you have enabled closed captioning and live transcription for your account, click here to access those options.
- Breakout Rooms: Start breakout rooms.
- Enable annotation for others: Allow or prevent the participants from annotating on your shared screen.
- Show/Hide Names of Annotators: Show or hide the participants' names when they are annotating on a screen share. If set to show, the participant's name will briefly display beside their annotation.
- Hide / Show video panel
- Hide / Show Floating Meeting Control
- Share Sound
- Optimize for video clip. Note: Do not enable this setting if you are not sharing a full screen video clip, as it will blur your screen share. This should be enabled/disabled before and after the video you wish to play.
- End Meeting: Leave the meeting or end the meeting for all participants.
For more detailed information, please visit the following sites:
There are two ways that you can make a user a co-host.
Step 1
During a meeting
- Hover over a user's video.
- Click the ellipsis icon
 .
. - Click Make Co-Host.
Step 2
Using the participants' window
- Click Participants
 in the meeting controls at the bottom of the Zoom window.
 - Hover over the name of the participant who is going to be a co-host, and choose More.
- Click Make Co-Host.
Once a participant has been made a co-host, they'll have access to the co-host controls.
For more information, please visit the following site